Save and use SSH Keys in KeePass
Introduction
This contribution is, as so often, motivated by events in my life and in this particular case the upgrading of my personal security mechanisms.
Basically, all my servers with at least 4096 bit long SSH keys are protected plus. 2 FA for each account on the servers. In addition, all data on all devices/servers are encrypted.
Accordingly, much "overhead" is hidden on my systems. For each registration I have a key, then the Public Key in the SSH Files, additional recovery keys for encryption, etc.
I have used cloud infrastructure to synchronize the keys to all devices where I need them.
The obvious drawback here is of course: if someone has the key, he can (if he additionally somehow gets the associated password and the 2 factor (I know quite unlikely, but it's about more or less all the data of my life), the person can gain access to my systems...
One thing I want to prevent if possible.
I have my own servers running for many services, which do not know anything about each other, for every service on the servers non-root users etc. But at the end of the day my entire infrastructure is merged on a control plan that is only accessible from my home network and when someone comes to it, the person has full access. From Homeassistant to Webserver, nothing is safe... It is necessary to prevent me if possible...
For this reason, I have considered how I can further improve the safety of my infrastructure and decided to expand my KeePass installation.
KeePass offers the possibility to store files within the KeePass Database. These are automatically encrypted (within the database) - only in the RAM are these NOT encoded, but stored in the "clear text"... Since I have encrypted every key anyway, this solution is a lot better than my current file sync approach. In addition, someone has to come to a memory dump from me... In any case, I have other problems.
In this post, I will therefore show how KeePass can be used to encrypt all kinds of protective files in the KeePass and, in the case of SSH Keys, for example, to allow automatic charging in Putty.
Disclaimer
This post shows neither the best solution, the most secure solution, nor the "only right" solution. I have adapted my infrastructure to me for years, which is why I enjoy many benefits in my daily digital world (for example, changing web server data without having to log in, this goes directly from my home network). Accordingly, I also adapt this solution to my needs. In this case, for example, I will bring Putty to load and use the SSH keys automatically from the KeePass.
But these solutions do not have to apply to you. I accept no liability for damages, lost keys or other.
Some parts of this post must be adapted to personal data. Therefore, please read.
The basic structure - KeePass Attachments
As mentioned at the outset, KeePass supports from home from files. Accordingly, data of any kind (PDF, text or keys) can be stored in the database. This is relatively intuitive among the respective entries > Advanced > File Attachments
Here files of any kind can be stored. In my case, the keys for the accounts are stored there. In my case, this looks as follows:
Once the respective files are attached, KeePass is done in principle. Theoretically, Putty could already be used by exporting the files every time you call, but this is maximum uncomfortable, which is why I will help with a plugin.
KeePass - Install KeePass Agent
To be able to automatically transfer the SSH keys to Putty later, the plugin "KeeAgent" needed.
This can be downloaded under the link listed above. The "KeeAgent.plgx" File can then be stored in the KeePass Plugins folder. This then looks as follows
Once this has been done, KeePass must be closed and opened again.
Configuring KeeAgent
Finally, the respective entry has to be adjusted for each key so that KeeAgent can access the data and forward the key to Putty.
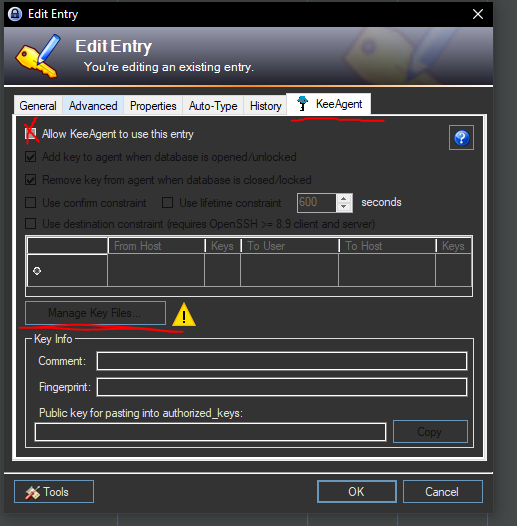
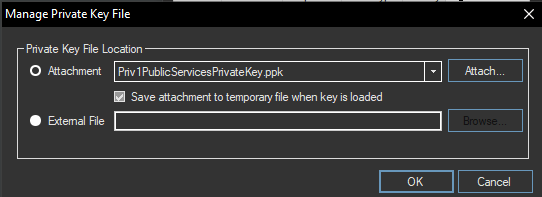
For this, the affected entry must be edited with the key again. In the tabs selection there is now quite right the tab "KeeAgent". Click here to get a new dialog that needs to be configured as follows:
1. Allow KeeAgent to access the data of this Entries
Two. KeeAgent to assign the correct key for access
KeeAgent for third-party programs
To allow other programs, such as Putty to use the key by KeeAgent, the AgentMode must first be activated for the respective entry.
For this, the menu utner Tools > KeeAgent must be navigated. Here comes when it goes directly the entry with the certificate you have just created. This then looks as follows:
Configuring Putty to Use KeeAgent
Lastly, there is a third-party program that can use the certificate. In this case, it's Putty.
This is quite simple in this case.
In Putty, first load the profile to be used (or created). It is important that the SSH > Auth > Credentials > Private Key - No file is linked here.
Accordingly, only the address is available in the profile. Finally, the login name has to be made available, for this under Connection > Data > Auto-login username the user that is used for the certificate.
In the following, Putty now uses the certificate from KeePass and automatically inserts the password of the key. In my case, this looks as follows:
Back…


