Smarthome - make light switches later and cheap smart
Introduction
I have a new apartment for half a year, which, despite new construction, unfortunately has no smart features. Within the apartment there is a classic electrical installation, which I want to have smart.
In this post, I focus on the various ways to make your own Smarthome (in this post specifically the lighting) smart and connect it to other systems. As always in my blog, I place value on local connection and also briefly discuss emerging disadvantages.
Initial situation
My apartment has a classic electrical installation. This means that my lighting and the “user circuit” – that is, where the sockets are, etc. – come out in the fuse box as a cable and are then distributed in parallel within the apartment. In the example of my living room, this means that I have received a cable in the fuse box, which goes on the automatic locking machine “living room”. When I shut off this machine, my lighting, the outlets and the shutters no longer have any power supply. Dementsprtechendous cover rails (DIN) solutions completely fall out. However, I have behind every switch deep under plaster cans (switch cans). Accordingly, there is theoretically the possibility for me to store in this can technique. Alternatively, application solutions can also be used (e.g. these Adjustable switches. That's what I used in my old apartment for about three years. I come to the “Reparts” in the following.
Possible products
The market for smart light switches is huge for both up and downput solutions. The main difference is in the version (how many switches/functions there are (e.g. dimming)), the communication possibilities (e.g. IR, ZigBee, WLAN or radio) and finally of course the installation type. Here it is possible to distinguish between plaster, plaster (standalone) and plaster.
The Sub-put variant Normally, the only possibility that the “smart” function of the installation does not notice, as the old “dumber” switches can be used further.
The Standalone variant makes it possible to place switches at any location of the house, but these products are often operated battery (or with luck by a piezo). I always keep a distance from battery solutions as they need to be changed and tested.
Last but not least, classic plaster variant. In this case, the entire switch is exchanged. It must be ensured that additional installations, such as sockets under the switch, either still fit with a simple frame or with integrated into the product can be.
For me, the following products have developed for testing:
Upput variant with socket (2 switch) – BSEED touch switch with socket
Output variant (only switch and dimmer) – Luminea Smart Touch Switch
Adjustable with display – LANBON LCD Smart Dimmer
Display (brand) – Sonoff NSPanel
Unterputz variant with ZigBee or WLAN – AIMENGTE Mini Smart Switch
Standalone variant (cheap) – ZigBee Wireless Switch from LEDLUX
Standalone variant (brand) – Bosch Universal Switch
Each of the products listed above has specific advantages and disadvantages. And is still not so easy or unusable in certain conditions.
Sonoff NSPanel
Sonoff is likely to be among the well-known brands in the Smart Home area and has long been captivating with a good quality paired with good prices. The NSPanel is no exception here and includes a lot of features.
The Sonoff NS Panel contains 2 controllable channels which can be used for example illumination. In principle, the channels can be mutually blocked in the app of the device, so basically this switch could also be used for roller shutters.
To switch the devices, the device uses relays that separate the lamps from power. The use of smart bulbs is therefore relatively uncomfortable (although more).
Unlike other products, the NS Panel can continue to be so-called. Insert widgets. These are other devices (which must also be registered in the app). With these widgets you can change the temperature, other lights or scenes. The device uses a 3.5′′ touch screen for this. Furthermore, the app itself can of course be used and Amazon Alexa, Google Home or Apple Siri.
Also noteworthy is the “LAN Control” mode, which allows the devices to be controlled only locally. For this purpose, the port 8081 is addressed via a web socket for the connected devices. As a result, the control of the devices is theoretically completely local and an Internet connection is purely technically not required. However, I do not exclude whether data is sent to the manufacturer.
Furthermore, the NSPanel can also be integrated with, for example, Tasmota in Homeassistant.
For people who simply need a smart switch, flashing with Tasmota will be unnecessary. The app can detect and integrate all kinds of devices, which means flashing only a certain situation is really necessary. All in all, however, I find the NSPanel very good.
However, the disadvantages are quite clear, series compatibility. It is absolutely necessary to install the old switch and possibly underlying outlets are no longer neatly usable. Accordingly, the NSPanel is only suitable if you want to exchange simple switches.
The other splash device with display additionally has an RGB frame lighting, but can only control the connected lamp (1 channel) and also not display any widgets. But the device costs just half as much.
Luminea Touch switch
I used this switch myself for 3 years in my last apartment for a room and was therefore very enthusiastic, apart from the necessarily switched on touch button lighting. These switches do what they should and are for me the classic Smart Home devices. Personally, I like the optics very much, especially on white wallpaper, the switches are very inconspicuous and stand out only by the illumination.
Here too, an app control is possible and furthermore these switches can be integrated into programs such as Homeassistant. The only manko is that if you do not prevent communication yourself, data will be sent to the manufacturer (mainly whether the switch is currently on or off). As this is a standard Tuya device, the switch can be paired with almost any Tuyakompatible app, such as Smart Living or Elesion. In this way, devices from actually different manufacturers can also communicate with one another and be integrated into automation.
Furthermore, both the dimming and the switching function can also be used by voice assistant.
For me, this switch and also the version with socket is a good choice if it should go fast. But here too, the lamp is separated from the current. Unlike the NSPanel, however, there are also options with one or two sockets and can therefore be used in the basic set at potentially more locations. Many light switches have, for example, a socket under the switch, this can also be used here.
Bosch Universal Switch (standalone)
The Bosch universal switch is one of the devices that I personally
only if I would use Bosch Smarthome devices anyway
and would like to continue to migrate from the manufacturer.
The universal switch can only be used with the Bosch own Smarthome headquarters
and from there also theoretically with ZigBee devices. However,
the switch itself is equipped with 868Mhz radio and can therefore
not natively without the Bosch Smarthome Centralle being integrated.
The second product of LEDLUX can help. This switch works with ZigBee and
can be added natively to any ZigBee capable installation.
The
The advantage here is that the switches are either screwed to the wall
or can be glued or alternatively as devices on the table
can lie. Here is no limit when selecting the positioning
set. However, this freedom comes with a great disadvantage. Both
Devices have batteries that need to be exchanged. If you are
but does not bother to replace such a battery every 6 – 12 months,
such a device can then be used without problems.
Underput Smart Switch
Lastly, the underput switches are coming. My personal favorite category. These switches are available both with ZigBee and with WLAN. Here, the devices can be operated completely locally (ZigBee) or via cloud (WLAN) or WLAN in hybrid mode (control of the devices local, if possible – otherwise cloud, if the device is not in the same network, for example).
These devices do not have any major disadvantages for me if you use the ZigBee variant when there is space in the installation box. I have 12 of these devices installed with me and the installation is the absolute horror, especially with double-switch cans in which a 5 wire cable arrives. In addition, these devices must not be pressed too strongly in the installation box because they otherwise switch to a “safe” mode and no longer switch. This has happened to me until now.
The great advantage of these switches, however, is that the switch series within the apartment are the same and furthermore no one can see that these switches are smart.
Furthermore, these devices are very reliable and in my case switch up to 3.6kW power. Accordingly, these devices can in principle also switch sockets. Finally, there are also DIN adapters for these devices to mount them in a safety box, which is why these devices are the Swiss pocket knife among the smart switches.
The only drawback, is the installation effort, because this can sometimes really upset if you don't have deep installation cans in the walls. In these cases, a splash or standalone switch is the best choice, as these are more or less as deep as the original switch. These devices have 40x40x24mm dimensions in my case and fit well into the cans with me. After about 1st day of work these were all installed.
Here too, the phase can be switched, but in the following I will show an alternative way I use in my apartment.
Installation options of smart switches
As already mentioned above, all given switches, the phase
the lamp voltage-conducting or voltage-free. Accordingly,
the lamp no longer has any tension and the lamp is out.
Meanwhile
have many people smart lights, which may be controlled by the bed
should be used or should use RGB effects or other. For
a data connection (WLAN, ZigBee or other) is always required.
However, if the switch switches off the phase, the lamp can also be
are no longer achieved. accordingly I have in my apartment
a different approach. The switches in my walls Switch only
the smart module and no longer the lamp phase. The lamp has
thus permanently voltage and the relay has nothing connected.
The
Advantage of this approach is that I first switch
can prove how I want. See some of my switches in the wall
like normal switches (because the original switch series stay on it)
can) and switch scenes with me, which my TV lighting based
of WLED, sockets and other stuff. I can
Switches only occupy time. In the bedroom there is one
Switch depending on the time and condition of the apartment, the Rollo
shutdown if it should still be open, turn on my TV,
the light in the bedroom turns on a night light or
entire apartment turn off the light.
This makes my switches
infinitely flexible and if I want to turn on luminaires, I can
make this both via the switch, through an automation, which
either in Homeassistant, in IFTTT, NodeRed or
Manufacturer apps can be created. And still I can
permanently control the lamps individually without the switch
has to do.
This procedure is in principle for all switches
possible. The circuit diagram then looks similar to the following. Links
is the “normal” installation, the two right strands, are the
modified installation. In this are the lamp and the switch
not connected to one another in terms of electrical engineering.
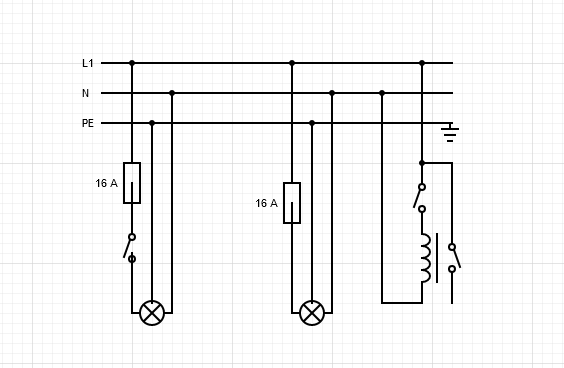
On the right you can clearly see that the switched output,
where normally the phase sits to the lamp, nothing is connected.
In the Smarthome I only work with the status of the switch itself (An
or off) – this can be easily queried. Same goes
with dimmable switches!.
The only drawback is that the
Processing should take place locally. This is in my case anyway
a claim and therefore no problem. When ZigBee devices are used,
in some manufacturers the automations are also local
held.
Conclusion
For me, the underput devices are the best option as the switches
remain in the original state and thus optically not as “smart”
are recognizable, but due to the adapted installation no limits
have. Standalone devices are a useful supplement, for example
in the living room on the couch or, if necessary, in the bed and can
bring a lot of comfort to personal application.
It shows
that if you think a little out of the box, that each
this device is too much more capable than what is being advertised...
A switch can have more than one function, for example, or
does not necessarily have to switch somewhat physically, but can
also used to start music or other things. The
Lighting means and switches are only logically linked, result
infinitely many ways to configure a smarthome so
can make much more comfortable and impressive.
In my case, I mainly use the Underput switch (in one case the ZigBee variantbut also with the Cleaning solutions (here with socketand Standalone solution you drive very well. The Switch with displayin my opinion are not much more than an expensive play,
which I build better on the tablets in my apartment anyway
:).
Lastly, it is again shown here that also favorable technology can work very well. A Smart Home does not need a project for 2. yearly, but can also be cheap and yet good to be implemented. It only depends on how big the profit margin for the manufacturer should be and how to use the purchased products.
Back…