Homeassistant - Unraid (and other servers) secure and easy to integrate
Introduction
In addition to adapting my Homeassistant installation, I would now like to include my virtualization server in the dashboard of Homeassistant and there data on system utilization or View memory utilisation.
In this beige, I went to search and finally got stuck with Google under the keyword Glances. In this post, I would like to show my Glances integration and what steps were needed to secure the data against unauthorized use.
As always, I do not have to accept liability and this does not have to be the best solution (even in terms of complexity).
There can also be better ways.
What is Glances?
Glances is a monitoring tool available for various systems. Now that this is said, it can continue :)... Glances is a system monitoring tool written in Python, which can pass the data on to other systems in a variety of ways.
Both active variants (e.g. export as CSV, ElasticSearch) are supported as well as passive options such as a web interface or a rest API. Glances can be used for free and can be extended or trimmed by "plugins".
Each plugin collects certain information or exports it in a special way.
In the following, I'll take a little more on it.
The advantage of using Glances is that there is both a native homeassistant integration and for all common systems (Linux, FreeBSD, OS X and Windows). Accordingly, the Glances installation is successfully installed even after a few seconds, only the Glances app must be installed in Unraid and the integration must be loaded with Homeassistant.
Only the IP address of the host is entered and the values appear in the Homeassistant dashboard. Nothing heavy...
But as soon as the installation of Glances in Unraid has been completed, we come to the following problem for me:
The problem with Glances:
The installation in Unraid is exposed to the assigned interfaces via a standard web server (e.g. to the LAN). No password query is required or HTTPS is used for data transmission. The documentation does not seem to be able to convert the REST API (passive) to https.
Only the RESTful service can be redirected to https, then sends all data (15Kb) to a Restful server once to this specified server.
From there, the data can then be passed on to other systems. Today, Homeassistant does not offer an interface at which these data can be supplied. There is only the possibility that Homeassistant itself queries the data at a RESTful Endpoint.
What solutions are offered?
For me, the possibility of seeing data unprotected and unencrypted is a no-go. Also in the LAN these data have nothing to look for unencrypted. Therefore, there are different possibilities from here starting to give the data safely to Homeassistant.
The first option would be a separate RESTful server that accepts and forwards the requests, this would then be possible completely in SSL. In addition, a wide variety of gateway plugins can be used, such as MQTT, ElasticSearch, Graph and some more. Since I already run an MQTT server within my network, the MQTT option is most likely to come into question for me.
MQTT is also supported with TLS and would therefore also transmit the data encrypted.
Pre-information
This project has proven to be much more complex than expected. Therefore, during this post, I will briefly and almost return the most important points of how to display the data in Homeassistant in a few seconds without encryption (by REST Api and MQTT).
Basic installations and conditions
This article deals only with the data link between Unraid and Homeassistant. Accordingly, the following things must already exist:
The following links include external articles that help with the respective preparation.
Operational MQTT Broker (can be installed in Homeassistant, or standalone)
Certificate for MQTT Broker must be present (including CA and CA certificate)
A working unRAID installation incl. installed community applications
Configuration of the MQTT Broker
First, the MQTT Broker must be configured to support TLS and continue to accept usernames. For this, the configuration file of the broker is changed as follows.
The configuration file is located at a standalone Debian installation under:
/etc/mosquitto/conf.d/*
Below is my entire configuration including required comments
# Choose the protocol to use when listening.
# This can be either mqtt or websockets.
# Certificate based TLS may be used with websockets, except that only the
# cafile, certfile, keyfile, ciphers, and ciphers_tls13 options are supported.
listener 8883 0.0.0.0
protocol mqtt
# Path to the PEM encoded server certificate.
############## Hier den Pfad ändern!!!! ################
certfile /share/mqtt-broker/test-instance/mqtt-test.jr.local.crt
# Path to the PEM encoded keyfile.
############## Hier den Pfad ändern!!!! ################
keyfile /share/mqtt-broker/test-instance/mqtt-test.jr.local.key
# ----------------------------------------------------------------- #
#Default authentication and topic access control
# ----------------------------------------------------------------- #
#Control access to the broker using a password file. This file can be
# generated using the mosquitto_passwd utility. If TLS support is not compiled
# into mosquitto (it is recommended that TLS support should be included) then
# plain text passwords are used, in which case the file should be a text file
# with lines in the format:
# username:password
# The password (and colon) may be omitted if desired, although this
# offers very little in the way of security.
#
# See the TLS client require_certificate and use_identity_as_username options
# for alternative authentication options. If a plugin is used as well as
# password_file, the plugin check will be made first.
############## Hier den Pfad ändern!!!! ################
password_file /share/mqtt-broker/test-instance/passwd
In this file it has now been defined that the MQTT broker works only as mqtt lister and does not use WebSockets. Furthermore, it was defined by definition of Password_file, where usernames and passwords should stand (as defined and encrypted, comes in the following).
Lastly, in the middle of the file the TLS connection was created by own certificates, with the files the broker will secure the connection.
Next, the broker can be restarted on the system.
sudo service mosquitto restart
Create username
To create users for the broker, the following command must be executed in the CLI:
mosquitto_passwd <
In the following, the user's password is set and stored in the file in an encrypted manner.
Install Glances and Prepare
Glances is currently a very powerful tool, but apparently not intended to work for it without official certificates (self-signite).
If the MQTT Broker uses public TLS certificates (such as Let's Encrypt, some steps will not be necessary.
Install Glances for Unraid as Docker Container
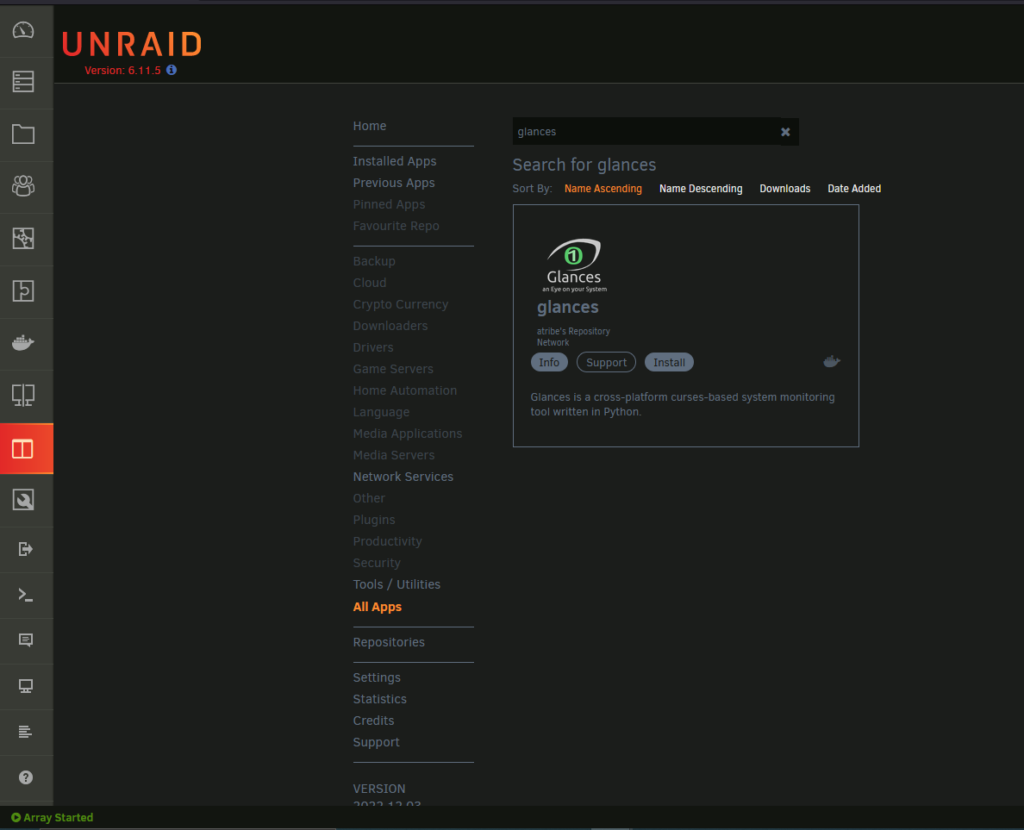
In order to install Glances for Unraid, only the "Apps" tab must be changed and searched for "Glances". The app that will then appear must be installed by clicking on "Install".
Glances is already installed in my case.
Once Glances is installed, the rest the Containers are set up.
For this purpose, the console must be opened under "Docker > Glances > Console".
As Glances runs as a container, you also have access to all files in the console.
On the file system (e.g. in a share) you should now find the certificate for the CA (ends with .pem in my case). If you edit the file, it should start with "[...] Begin Certificate [...] ". Otherwise there's something wrong:)
In the next step, a script is created which makes the certificate usable for python (certifi), so that we can also connect to the broker with certificate check and do not get an error.
If a public certificate has been used for the broker, this step NOT necessary!
vi importscript.py import certifi cafile = certifi.where()
#The following path must be changed :)
with open('Pfad-zurCA-PEM-Datei', 'rb') as infile:
customca = infile.read()
with open(cafile, 'ab') as outfile:
outfile.write(customca)
print('That might have worked.')
python importscript.py
After this has happened, "That might have worked" should be in the shell...
In the next step, the start command of the container must be adjusted so that it receives the correct configuration and sends the data with MQTT.
Customize Glances configuration
To customize the Glances configuration, we create a file of any name within the Unraid file system.
I created my file in a folder under AppData > views, as there are the configuration files for containers. In the configuration file (to find here) is changed by me only the point "mqtt" following
[mqtt]
# Configuration for the --export mqtt option
host=192.168.2.6 #hier muss eine IP stehen, wenn der DNS Name nicht durch 8.8.8.8 (Google DNS) aufgelöst werden kann. port=8883
#den Port entsprechend der Broker Konfiguration anpassen
tls=true
#falls ihr keine TLS Verbindung nutzen wollt (unverschlüsselt) muss hier false stehen
user=glancesuser
password=glancespw
topic=glancestopic
topic_structure=per-metric
Once the file is created, Glances can now be started.
It is important that the container is not rebuilt! - Once the container is rebuilt, the local certificate is deleted again! - so it goes back to the bracket of glances and here the following command is executed:
glances --export mqtt -C /Pfad/zur/config/Datei
Glances should now start and switch to the local dashboard.
Next, the MQTT Broker can see whether the necessary data is available.
A program like MQTT Explorer can be used for this.
In my case, it looks as follows in my dashboard:
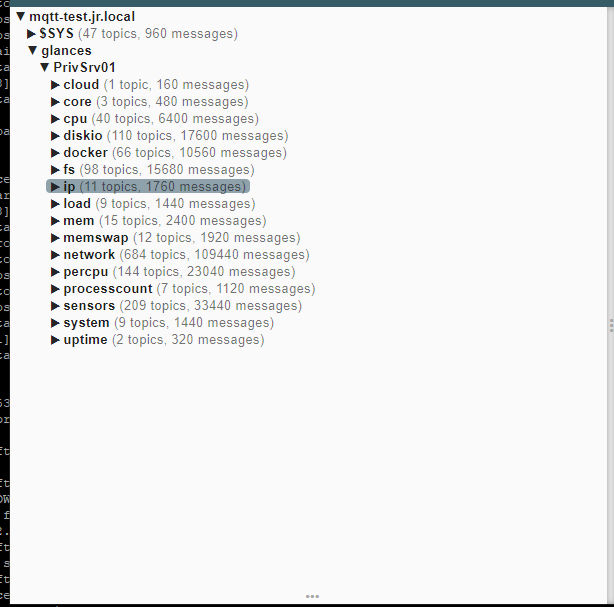
Glances now sends the data encrypted to my MQTT broker.
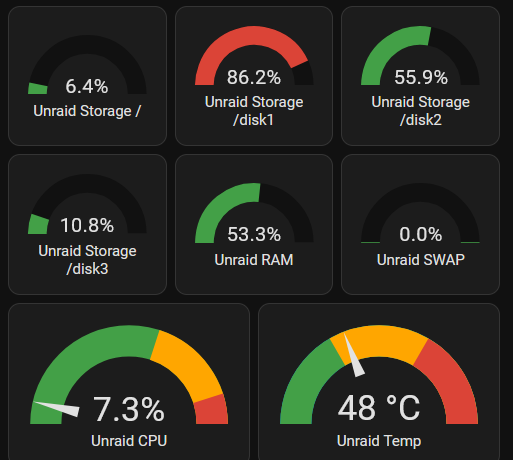
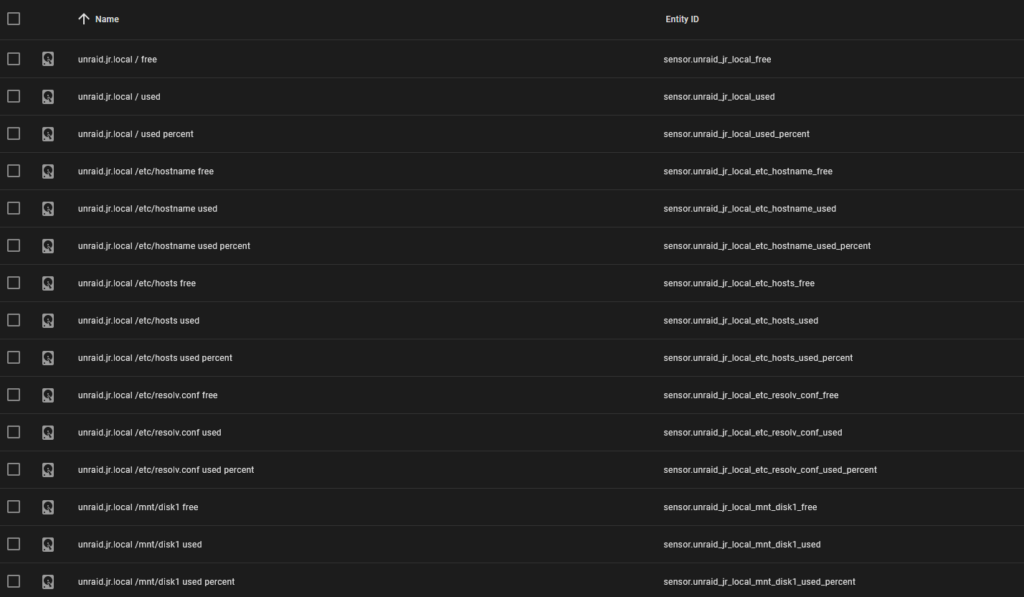
Finally, the data must be imported into Homeassistant.
To learn how to import MQTT data in Homeassistant as individual sensors, please check the relevant contribution. In my case, it looks as follows: The values are in a dashboard to control .
Back…